
Well, it’s been a long time since I published a new recipe on my blog. Years, in fact. But this post really isn’t about the recipe, it’s more about the method. As I like to say, “The method makes the bread.” So the recipe is just a simple white sourdough bread with a little whole wheat to liven it up a bit. Nothing fancy. What I really want to discuss is the method, so let’s discuss . . .
As you might guess from the name of this post, this method is meant to have a long slow rise. Now I know that sourdough in general has a pretty long slow rise as it is, but this method stretches it out even longer. Nothing extreme, like some of those overnight or even 24 hour rising loaves I’ve seen from time to time. Those can be risky — too easy to over ferment. This method is a bit more reasonable, pushing bulk fermentation to 8-9 hours, or thereabouts.
I do frequently use one method that pushes bulk a bit further, and I’m hoping to post that method next, but this is typically about where I top out when it comes to length of bulk. In order to achieve that length of time — especially when the temperatures are warm, as they’ve been for me this summer — requires using a very small amount of sourdough starter. Depending on the strength of your starter, that typically falls into the range of 2.5% to 5% of total dough weight. Yes, dough weight. I don’t measure the starter in baker’s percentage (the short reason is that it’s simply more convenient for me, the longer detailed reason can be found in my book, “Open Crumb Mastery“).
The big caveat though is that your starter must be healthy, strong and active.
By “healthy,” I mean a starter that functions well and has a well-balanced microbiome. It is not brand new, because new starters are typically unbalanced and have yet to find equilibrium between the yeasts and good bacteria. Unhealthy starters often have proteolytic tendencies, and you put your loaves in danger of gluten degradation when letting the dough rise so long with an unhealthy starter as the leaven. A healthy starter is consistent and predictable. Reliable. If your starter is unhealthy for any reason, do not use it for this method until you’ve brought back to full health.
By “strong,” I mean a starter that naturally rises at a reasonable pace. A strong starter will typically at least double in volume within 8 hours (though tripling is better) when fed at a 1:2:2 ratio at warmish room temperatures. A very strong starter can triple in volume within 6 hours. Most healthy starters are capable of at least doubling in 8 hours. But I have worked with some particularly slow risers — even though they were perfectly healthy — that would not be suitable for this method. At least, not in the timeframe I’ve given here.
By “active,” I mean a starter that has been bubbling away on your counter for at least a few refreshment cycles. Don’t take your starter directly from the fridge after three weeks and put it straight into this dough. Let it wake up first! I know there’s a whole host of youtube videos demonstrating that you can make bread perfectly fine with a starter that’s been sitting in the fridge for months on end. Okay, fine. Good for them. But they are the exception. Most folks attempting to bake bread that way are gonna have a bad day. And if you try that with a method like this, that uses so little starter, you’re gonna be cursing the name of whoever it was that told you using old fridge starter was just dandy.
So now that we have an understanding regarding what’s to be expected of your starter before attempting this method, let’s get to the specifics of the method itself, the logic of how and why it works, and why I’ve been baking this way lately.
The Method
Because of the small amount of starter used in this method, fermentation is naturally long and slow. It takes quite awhile for the dough to start moving when you’re only using 2.5% starter as a percentage of total dough weight (just 20g for an 800g loaf). And when it does finally get moving, it takes a while longer to really start picking up speed. So this is a method of delayed fermentation. I’ve explained “delayed fermentation” in-depth in my book, “Mastering Bulk Fermentation and Dough Structure.”
One of the benefits of such a slow fermentation is improved flavor. Not everyone agrees, but in my personal experience, I find that breads made with smaller amounts of starter and longer fermentation times tend to taste better than breads made with larger amounts of starter and shorter fermentation times, all else being equal. So I frequently use small amounts of starter when I’m looking for the most flavor.
Another benefit of a long slow fermentation is that it provides plenty of time to develop gluten and/or dough structure. If you’ve ever read any of my writing then you’ll know that gluten is not the same as dough structure. Gluten is an important component of dough structure, but dough structure is more than just gluten. Dough structure consists of both gluten and the gas that’s trapped in that gluten. That’s what forms the alveoli. The bubbles. Furthermore, dough structure can be organized, to a greater or lesser extent depending upon your preferences. I won’t go too deep into that here (that’s what my books are for). But I do want to mention a couple different strategies you can employ when using a delayed fermentation method such as this.
Strategy Number 1: You can use all that extra bulk fermentation time to build lots of dough structure. When you really want to maximize dough structure, a long bulk can do wonders. When might you want to maximize dough structure? I won’t go too deep into that here (again, my books) but basically whenever you want a more even crumb structure (as opposed to an irregular crumb); or when you need to turn a wet slack dough into something capable of achieving decent shape, height and volume. That’s just to name a couple reasons.
In order to maximize dough structure, you need to be able to start building dough structure right from the very start of bulk fermentation. As already noted, gluten is a major component of dough structure. Until the gluten in your dough is fully formed (windowpane, or close enough), then structure building will be inefficient — it’s hard to build dough structure when one of its main components isn’t quite ready for prime time.
Now then, folds both develop gluten and build dough structure. When the gluten is not yet fully formed, then the major effect of folding is to develop the gluten. Once the gluten is fully formed, then the major effect of folds is to build dough structure. If you’re trying to maximize dough structure then it’s important to make sure your gluten is developed as early as possible. And the best way to do that is to mix your dough to full gluten development right from the start. If you have a mechanical mixer, then that’s easy peasy. If you’re hand mixing, it can be a bit more difficult (though not impossible). A lengthy autolyse (2+ hours) can go a long way towards helping the hand mixer develop better gluten during the mix.
By fully developing the gluten during the mix you ensure that all the folds you perform during bulk will primarily be building dough structure, and not being wasted on developing the gluten. The long bulk will give you plenty of time to give your dough many sets of folds, and thus develop plenty of dough structure as your dough slowly rises. And if you want to take it a step even further, then use coil folds rather than stretch and folds (assuming your dough is extensible enough). Coil folds build more layers, more organization, and therefore more structure.
This strategy is one I commonly use when working with high-hydration dough. It’s particularly well-suited to transforming wet slack dough into something with strength and body. Something that can be more comfortably handled, holds form and tension, and is capable of achieving height and volume.
Strategy Number 2: If you aren’t concerned about maximizing dough structure, then you don’t need to be concerned about fully developing the gluten during the mix. You can let time and folds do their work. The folds in the early part of the long bulk fermentation will primarily help out gluten formation, and the folds during the latter part of bulk will primarily help with structure building. Since bulk is so long, you’ll still have plenty of folds left to build dough structure once the gluten has finished forming. With a shorter bulk fermentation, by the time you’ve finally finished developing the gluten, you might not have much time left to fold for structure. So this strategy gives you enough time for substantial structure building, while still letting you take your time developing the gluten.
This is the strategy that we’ll be using with this loaf.
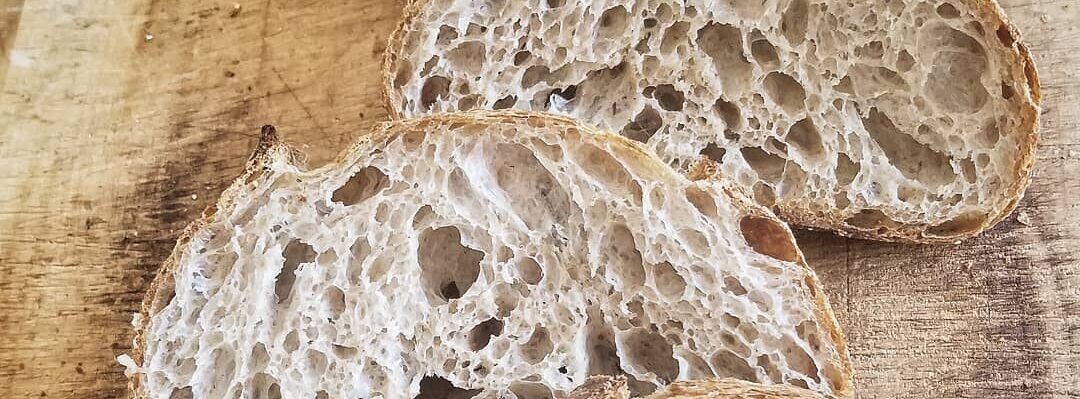
I wanted an open crumb somewhat in-between irregular and regular. I wanted a bit of irregularity, but also a bit of honeycomb. In general, the less developed your gluten is at the start of bulk, the more irregular your crumb tends to be since, as already mentioned, the folds in the early part of bulk work more to develop gluten than build dough structure. Less dough structure = more irregularity. And vice versa.
But since bulk is so long in this case, there’s still plenty of time for structural development once the gluten has finished forming. This method builds enough structure to get a bit of that honeycomb effect, but not so much that it’s completely devoid of irregularity — which I think adds character and interest to a bread. Now to be honest, I wasn’t that concerned whether this crumb turned out more or less honeycomb or irregular. I figured the method would split the difference for me and I’d just let the chips fall where they may. And that actually seems to have worked out pretty well — a little irregularity, a little honeycomb. I have no complaints, especially considering the lowish hydration.

Of course, there are plenty of other ways to attain similar results. In bread baking, there are usually several paths that lead to the same destination. The reason I’ve chosen this particular method is mainly a matter of convenience for me. If it’s not convenient for you, then maybe consider a different method. Lately, I simply haven’t had time to spend more than a few minutes at a stretch working on the dough. I have too many other things going on at the same time. But I’ve had all day to check in on it every hour or so and give it a couple minutes mixing or maybe a set of folds.
So this method works with my current routine. I never spend more than 5 minutes or so at any one time working on the loaf. I stop by each hour to do what needs to be done, then I get back to my other business. If you’re home all day, but constantly running around doing so many other things that you don’t have much free time at any single moment, then this method might work for you as well.
One of the best things about baking bread is there are so many different ways you can customize your baking method and schedule to accommodate your daily routine. This loaf is an example of how you can get amazing bread with very little effort and “hands-on” time. And yet, this bread isn’t some neglected no-knead loaf sitting around forgotten and ignored on your counter. Those can be great loaves, and definitely have their time and place, but this particular loaf still has the mark of skill and intention. It shows design and forethought. This is a loaf that’s been built, not just left to whatever end. And that counts for something in my book.

Now let’s get to the video and general instructions . . .
Formula
- 90% Bread Flour
- 10% Whole Wheat
- 70% Water
- 2.5% Sourdough Starter (as a percentage of total dough weight)
- 2% Salt
Recipe (≈800g Loaf)
- 414g Bread Flour
- 47g Whole Wheat
- 319g Water
- 20g Sourdough Starter (@100% Hydration)
- 10g Salt
Mixing
This is a direct mix. All ingredients at once, no autolyse. Since I’m not looking for maximum dough structure, I don’t need to ensure full gluten development during the mix. I typically use autolyse to help form gluten when hand-mixing high-hydration dough, but that’s not a concern for me with this loaf. So no autolyse necessary.
This mix happens in two separate phases. Let’s call phase 1 the “Initial Mix,” and phase 2 the “End of Mix”.
Initial Mix: As you can see from the video, basically I just mixed the water, salt and starter together to evenly disperse the starter, then added the flour and started stirring. After a couple minutes I switched over to using the Rubaud Mixing Method for a few minutes more, then I covered the dough and let it rest for an hour. The mixing took 5 minutes (at most). With no autolyse, and such a limited amount of mixing, very little gluten development takes place. But that’s okay because during the 1 hour rest the flour will continue to hydrate and gluten will continue to form.
End of Mix: After the rest, I give the dough a few stretch and folds to layer the dough and build some dough tension. Really stretch the dough to develop that tension — dough tension helps make the dough easier to handle. Once I feel enough tension develop for handling, I switch to a technique that’s difficult to explain. I would say that it’s easier to understand by watching my hand in action, but unfortunately my videography skill are pretty abysmal and I managed to cut half of the action out of the frame. So let me try to explain . . .
Basically, with my fingers I’m pulling dough from the back side of the lump towards my thumb. Then with my thumb I press that dough back into itself. It takes some practice, and you have to move quickly or the dough will start to stick, but once you get the motion down it truly works wonders. Very quickly this technique smoothes out the dough; stretches, tightens and aligns the gluten sheets; and transforms the dough from a limp lump into a tight ball. But if you can’t quite get the hang of this maneuver, don’t sweat it. Just keep folding the dough like at the start and it will eventually tighten up and form a nice ball. It takes a little longer that way, and the dough won’t get quite as tight and smooth, but all that will get sorted out during bulk fermentation.
Once I feel the dough is extra smooth and nearing maximum tension, I slide the dough around the sides of the bowl to pick up any remaining dough bits, while simultaneously tucking the dough under itself with my fingers to build extra tension. Finally, I cup the dough with my hand and drag it towards me a few times (seam-side down) to build up that last bit of tension before picking it up and transferring it to a clean bowl for bulk (though you can certainly leave it in the mixing bowl to proof if you prefer).
This technique gets progressively more difficult the wetter the dough. I usually top out at around 80% hydration, though on a good day I might be able to hit 85% (particularly if the dough has a lot of whole grain to absorb the water). If you’ve never tried this before, I suggest practicing your way up the hydration ladder. Start at 60% hydration (fairly easy, even for inexperienced hands), move to 65% (harder, but not too bad), 70% (the hydration we’re working with here, tricky but not impossible), then 75% and up (pro skills).
Bulk Fermentation
I let this dough bulk proof for 7.5 hours, but total bulk fermentation time was 8.5 hours since it was fermenting for an hour between the initial mix and end of mix. Total volume rise was probably around 75%. A particularly high rise, but not quite doubled. I gave it five sets of stretch and folds at hourly intervals after the end of mix. After the fifth set of folds I let the dough rise for another 90 minutes without folding before preshaping. I often (though not always) like to let the dough end bulk with an hour and a half to two hours of undisturbed rise before the preshape. It helps the dough to relax a bit, the crumb to open up and “settle in”, and helps lend a bit more irregularity to the crumb.
However, if you want to make an even more structured dough in order to improve shape, height or volume (although this loaf was pretty good in those categories, I must confess); or if you want to emphasize the honeycomb qualities of the crumb a bit more, then feel free to use coil folds rather than stretch and folds, and maybe throw in a sixth set of folds rather than letting it rest so long untouched at the end. You may be able to stretch out the fermentation another 30 minutes by adding a sixth set of folds since the tension generated by the folds will help contain the dough from overproofing. But beware, the proofier the dough gets the more difficult it will be to handle. Proceed at your own risk.
I should also add, these are the times that my dough took to rise in my kitchen, with my starter, and under my conditions, on that day. My kitchen temperature was warm and humid: mid-70s F at the start of mixing and mid-80’s F by the time my dough was shaped. It’s summer and my kitchen gets toasty. Your mileage may vary. So consider my schedule as a loose guideline only. You don’t have to stick to my exact proof times or fold routine. Do what works for you. This is just what happened to work for me on that particular day.
Preshape
To cleanly release the dough from the unoiled bowl without stretching or tearing it, I just gave it a very gentle fold before turning the dough out onto the bench. “Gentle” is the key word here. The dough should be quite delicate by the end of bulk fermentation. So be careful. Turn it out seam-side down to make sure the seam gets tucked under when you round the preshape.
If you prefer, you can just tip out the dough and scrape down the sides with a plastic dough scraper to remove the dough. You might get a bit of stretching and tearing, but if you’re gentle it shouldn’t be too bad. I like using the fold at the end of bulk because it’s clean and gentle; and it adds extra strength, structure and tension to the dough. Extra strength, structure and tension are not always desirable, but in this case I thought it was.
Once the dough is turned out I use the bench knife to round and tighten it before letting it rest (uncovered on this hot and humid day) for 30 minutes. But feel free to preshape in whatever method you prefer.
Shape
Not too much to say about shaping. The video pretty much demonstrates the technique better than I can explain it. But I’ll say this, the shaping method I chose is a variation of cinching (I discuss shaping methods in-depth in “Open Crumb Mastery”). I chose this method because it’s fairly gentle (no patting the seams shut or degassing) and reasonably efficient (doesn’t require an excessive amount of handling).
This was a good method for dealing with a well-risen, fairly strong dough. If the dough was less proofy, weaker, or more slack and extensible, then I might have gone with stitching instead. Stitching builds lots of structure and tension into weak slack dough so that it can actually hold a shape, but it does require more handling. More handling is less efficient and provides more opportunities for damaging the dough with handling errors. I tend to adjust my shaping method to the dough in hand, but feel free to shape however you like.
Final Proof
I let this dough rise in a flour-dusted linen-lined basket for 1 hour on the bench before putting it in the refrigerator overnight. I don’t determine that length of time by formula or charts. I make the judgement based on previous experience, the conditions of the day, and intuition. Just one day prior I made this exact same loaf, in the exact same way, with the exact same ingredients, in the exact same kitchen, with the exact same temperatures . . . and yet I needed to let the dough rise for 90 minutes on the counter before placing it in the fridge rather than 60 minutes like this one — and it was still less risen than this was. The previous day’s dough was rising just a wee bit slower overall throughout the day than the loaf that I filmed. Why? Who knows? It’s bread. It has a mind of its own.
My point is that you must determine for yourself exactly how long to let the dough rise before placing it in the fridge, if you even let it rise at all. Sometimes the dough just needs to go straight into the refrigerator immediately after shaping. And sometimes it needs to sit out longer. In winter I often let my dough rise almost to the point of being ready for baking before I pop it in the fridge. This is an individual and variable consideration. Do what works for you.
Baking
I baked this loaf straight from the fridge. But if your dough is still not fully risen by the time you’re ready to bake please feel free to take it out of the fridge and let it warm up and rise until it’s ready. I baked this loaf at 450F (232C) for 20 minutes with steam (for open bakes like this I use a thick baking stone and a pan full of lava rocks that I carefully pour boiling water into to make steam). After 20 minutes I (carefully) remove the pan of lava rocks, rotate the loaf 180 degrees, and lower the temperature to 425F (218C) to bake for another 20 minutes. I bake to a medium-dark crust color, but feel free to bake to your own preference.

If you’re baking in a Dutch oven, or equivalent, then I would bake at the same temperatures: lid on at the higher temperature for the first 20 minutes, then lid off at the lower temperature for the next 20 minutes. If you’re prone to getting an overly dark bottom crust when you bake in cast iron then consider placing some sort of shielding beneath the cast iron on the rack below it. I like to take a couple sheet pans that I invert one on top of the other. That provides a shield from the heating element at the bottom of my oven, and it also creates a cushion of air between the pans that acts as insulation. Usually I can get away with slipping the sheet pans under the cast iron when I remove the lid. This allows the full blast of heat for the first 20 minutes to encourage ovenspring, but still provides enough protection during the remainder of the bake to prevent a scorched bottom. But your mileage may vary, so if you need to use shielding right from the start then go for it.

Cool and Enjoy!
I always tell folks to let their bread cool for at least 2 hours before slicing into it, but I know nobody listens. I don’t even take my own advice half the time. But at least try and wait for 30 minutes to let the crumb set a bit more. If you really want to enjoy the bread hot consider splitting the recipe into two smaller long and narrow batards — a little shorter and fatter than baguettes. Adjust bake times and temps to get the crust you want, then tear into them as soon as they’re cool enough to touch. Make sure your friends and family are there to enjoy the hot bread with you!


Cheers!
Trevor
What a beauty! Thank you very much for your guidance. 🙂
Thank you! Happy I can help!
Thank you for this! If I normally use Kirkland organic AP flour, how would you recommend adjusting hydration since it’s a slightly lower protein content than true bread flour? Also, my family prefers the flavor of rye flour, so I usually do a combo of the AP and rye — would you suggest I sub rye for the same amount of whole wheat you list in your recipe? Looking forward to trying this out — thanks!!
Hi Tamara, it might be helpful to reduce the hydration by a few percentage points. And you can certainly swap out the whole wheat for rye. But really, this recipe was just meant to help me demonstrate the technique. You can use this same method with other recipes, so if you already have a recipe that you like there’s no reason not to use that if you prefer. The main thing you’d probably need to adjust is the amount of starter since this method is specifically meant for dough with a very small amount of starter.
Доброго дня, Тревор! З великим задоволення прочитала Ваші поради. Буду пробувати випікати такий хліб. Дякую, що все так детально пояснюєте!
You’re very welcome! I’m happy to help! Good luck with your bake!
I started baking not too long ago, learning from your videos and this blog, and you can’t imagine how happy I am to see a new recipe! My bulk was 6.5 hours (, most likely because it was 86 degrees all day. Probably should have extended the bulk a little bit or/and proof at room temp longer, but I’m very pleased with the result regardless.
Pic 1: https://imgur.com/G37NK45
Pic 2: https://imgur.com/lC8ep10
Thank you for all you do and post!
Your loaf is beautiful! Nicely done! I’d say you were pretty much spot on — I’d be very pleased as well!
This is really fantastic. The explanation and video are very clear. I’ve never seen such a low percentage of sourdough starter. Does the starter need any specific handling before being used in this recipe? Thanks. Nicola
As long as your starter is healthy, strong and active — as defined in this post — then it should be perfectly fine to use. No specific handling necessary.
I am 6 months into sourdough baking . I started with the Tartine recipes, and had spectacular failures. Your books and videos ( very zen! Just like sourdough baking should be) have saved me. I now understand bulk fermentation, and actually enjoy dough handling. Thank you! This loaf with low percentage of starter is wonderful! Love the flavor. One question, can I pat the dough a little when shaping to avoid large holes? I’m not a purist. My husband loses his jam and butter.
Thank you for the in depth explanations!
For warm climates (even with air-con), could I delay fermentation by placing the dough in the fridge for short periods of time – say 10-15 minutes?
In addition, would this method also work with a 40-50% whole wheat ratio at 70% hydration?
Thanks!
This is a full proof recipe. I was late for work and my 20 year-old wanted bread for camping and he was leaving the next morning so I asked him to mix everything together and just ground him some weight for the whole week korasan.
I came back eight hours later. He had used chunky Persian blue salt and mixed the almost all the way.. I gave it some stretches and folds and a couple of hours so at least everything was hydrated. Did a long bench rest and a long post shaping proof before putting in the refrigerator. It came out really well not totally best, but really far far from my worst. The starter was in good shape and I think that helped.
But this is my go to recipe when I’m running out the door. I can’t do anything but mix and. Pray.
And I love the way finishing the ends keeps the bread tall!!! I have one of two that just came out of the oven. Sam took the other camping yesterday and I’ll cut a crumb shot when I can, though I did keep the second loaf in the fridge longer than I intended!.
In the above comment, full proof was once typed foolproof. And I hate AutoCorrect..
I double hate AutoCorrect because I ground him some wheat not weight
This looks absolutely amazing
But I would love to speed up a process
Can I increase the starter amount and if so do I decrease the h20?
Thank you 🙏